Are you using a Facebook Messenger bot to talk with customers? Wondering how to build an email list using your bot?
In this article, you’ll learn how to automate the capture of email addresses (and other user information) into the email marketing service of your choice.
How to Grow Your Email List With a Facebook Messenger Bot by Kelly Mirabella on Social Media Examiner.
#1: Set Up a List and Welcome Message in Your Email Marketing Service
With a few steps and integrations, you can start using your Messenger bot to build out your email list. This article shows you how to set up this process using the Pro version of ManyChat (starting at $10 per month) and the email marketing service of your choice.
To get started, log into your email marketing service. Next, you’ll need to create a list to which you’ll add subscribers from your Messenger bot and set up any automated messages you want to send when users are added to your list.
In this example, we’ll be using Mailchimp, which offers a free version. If you’re using a different email marketing service, adapt these general steps to create a list and automated message in your provider, and then skip to Step #3.
Create a List for Subscribers
First, you’ll create the list to which you’ll add subscribers from your Messenger bot. In Mailchimp, click the Lists tab at the top of the main page and then click Create List on the right side of the screen.
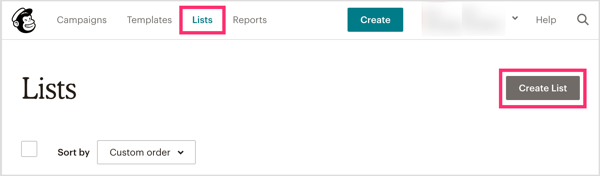
Follow the prompts to create your list and click Save when you’re done.
Set Up a Welcome Message
Once you’ve created a list, you’ll want to set up the automated welcome message. This message can range from a simple confirmation of being added to the list to an email that delivers a lead magnet or mini-course.
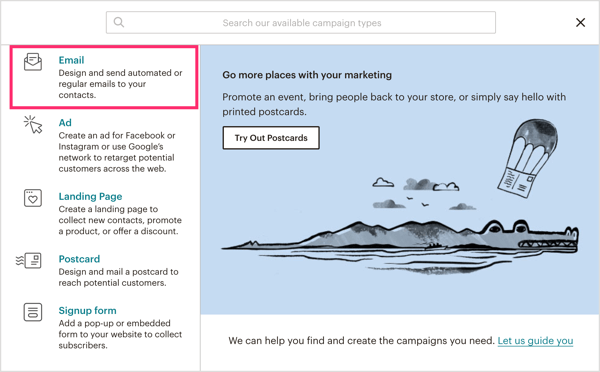
On the Mailchimp home screen, click the Create Campaign button.
In the pop-up window, select Email.
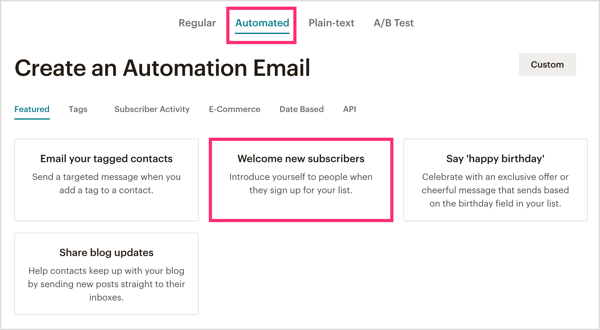
On the next screen, click the Automated tab and select Welcome New Subscribers from the list of options.
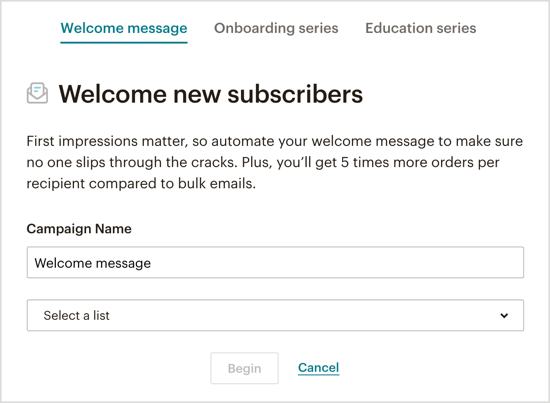
Next, you’ll select which type of automated welcome email you want to send. There is no right or wrong answer here. The choice comes down to what your subscribers expect. Here are your options:
- Welcome Message is a message that welcomes your subscriber to your list and perhaps delivers a single lead magnet.
- Onboarding Series is when you have more to say and you don’t want to overwhelm your new subscriber with too much all at once.
- Education Series is great for delivering eCourses, mini-courses, and/or tips and tricks via a series of emails.
Decide which style is best for you and then select the list you just created from the drop-down menu.
From here, you’ll want to design your email or email series depending on which automated email you choose.
When you’re finished setting up your welcome message, the next step depends on which email marketing provider you’re using. If you’re using the built-in Mailchimp integration, proceed to Step #2. If you’re using a different email marketing service, skip ahead to Step #3 to tie it all together with a clever tool called Zapier.
#2: Connect Mailchimp to Your Messenger Bot Builder
If you’re using Mailchimp, the built-in integration makes it easy to connect Mailchimp to ManyChat. After that, you’ll set up your Messenger bot to ask for and capture the user’s email address.
Create a Custom Email Field in ManyChat
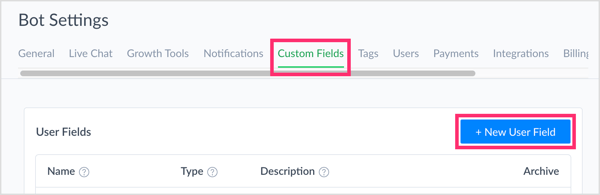
First, log into your ManyChat account and click the Settings tab on the left.
Click Custom Fields in the top menu bar and then click New User Field to create a custom field that saves the subscriber’s email address.
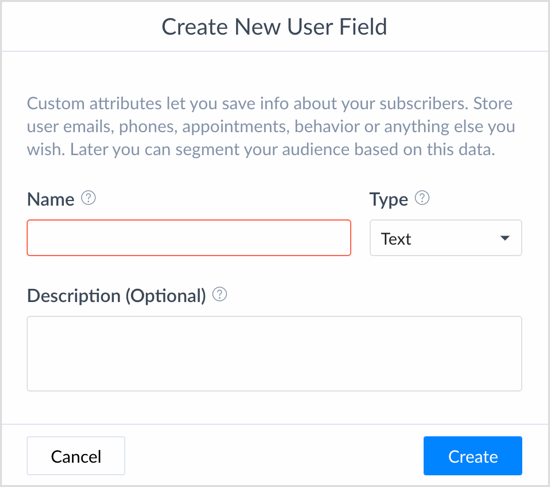
In the pop-up window, type in a name for your custom field (for instance, User Email or Email Address) and select Text from the drop-down menu. Then click Create.
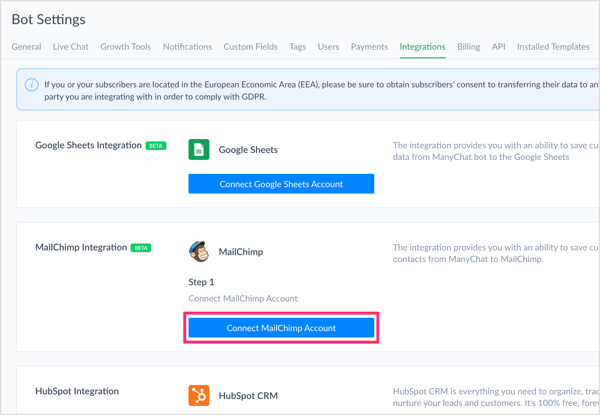
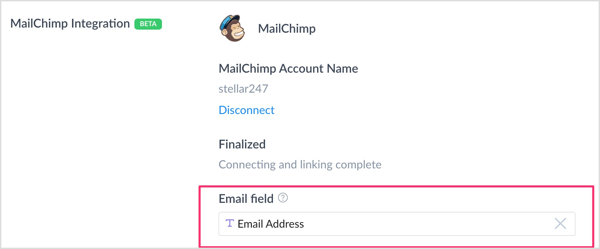
Set Up the Mailchimp Integration in ManyChat
In Settings tab on the left, select Integrations in the top menu bar. Then click Connect Mailchimp Account.
Note: If you don’t see Mailchimp as an option, skip to Step #3 below.
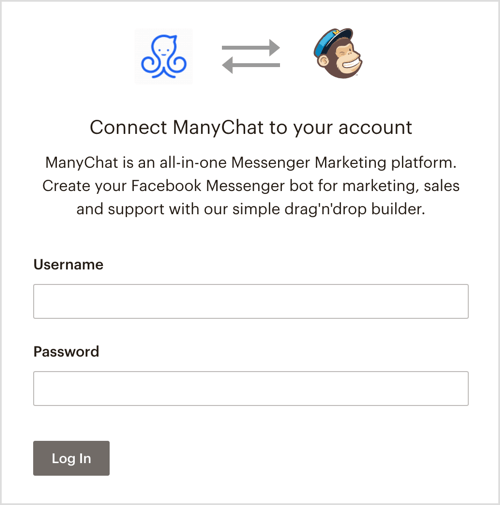
Next, you’re prompted to sign into your Mailchimp account.
In the Mailchimp Integration section, click in the Email Field box and select the custom field you created to capture email addresses. This step finalizes the integration between ManyChat and Mailchimp.
Set Up Your Messenger Bot to Ask for and Capture the User’s Email Address
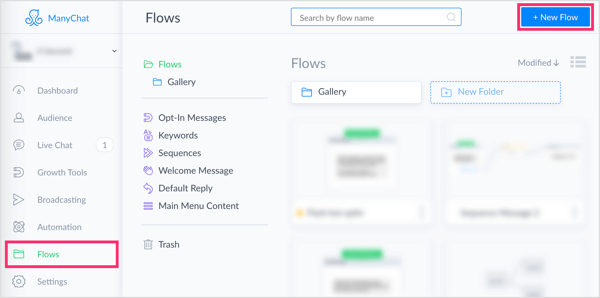
Now that you’ve connected Mailchimp and ManyChat, the next step is to navigate to the Flows tab in ManyChat. In the upper-right corner of the page, click New Flow.
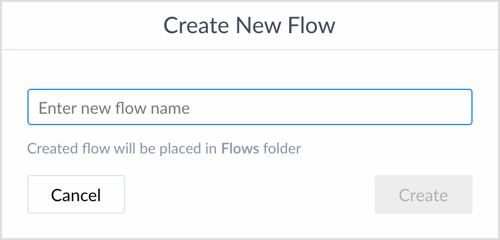
Be sure to title your flow so you can organize and find it in the future.
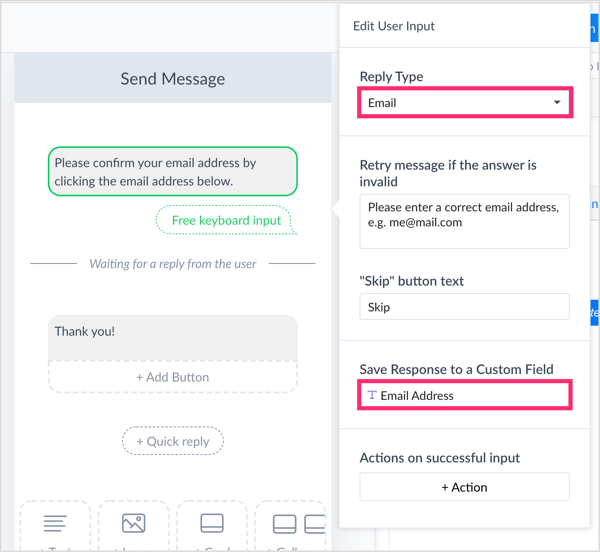
In your new Messenger bot flow, create your first message or any number of messages in your flow to help qualify your lead. When you’re ready to ask for the user’s email address, add a user input, which is a ManyChat Pro feature.

In the Edit User Input pop-out, select Email for the Reply Type, which will help Facebook autopopulate the user’s email address in the chat. All the user will have to do is click on their address in the chatbox to confirm it or type in an alternate email if they wish.
To capture this data properly, create a custom response. Under Save Response to a Custom Field, select the custom field you created earlier to save your subscribers’ email addresses.
To make the connection from ManyChat to Mailchimp once someone confirms their email address, you need to create an action. Under Actions on Successful Input, click Action.
The action you select depends on which email service provider you’re using. For Mailchimp, choose Mailchimp Actions from the list.
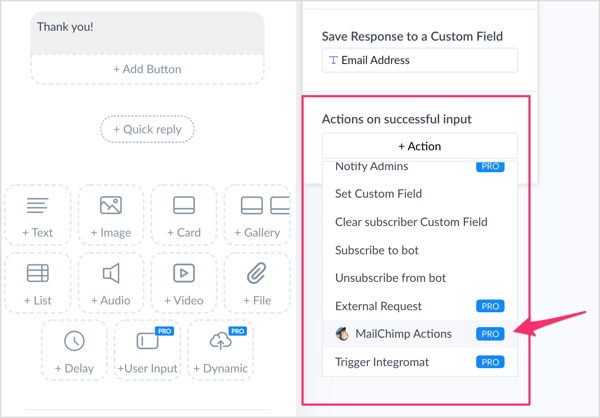
Then select the list on which you want to have your subscriber land for this Messenger bot flow. Remember, this is the list you created in your email service provider in Step #1.
That’s it! Your ManyChat flow can now be published and the user emails will be sent to the list you created in your email marketing service.
#3: Connect an Email Marketing Service to Your Messenger Bot Builder With Zapier
If you don’t have access to the Mailchimp built-in integration or want to use a different email service provider, you can use Zapier to accomplish the same thing.
Zapier is kind of a go-between for many apps, and there’s a free version. You’ll use it a lot with ManyChat to integrate with a number of different CRMs, email marketing tools, Google Docs, and the like. It’s a fantastic tool for making your Messenger bot smarter without having to know any coding language. Chances are Zapier has the email service provider of your choice if you don’t use Mailchimp.
Set Up Your Messenger Bot to Ask for and Capture the User’s Email Address
First, you’ll need to create a chatbot flow in ManyChat. Navigate to the Flows tab on the left and click on New Flow in the upper right.
Add a name for your flow so you can organize and find it in the future.
Now create your first message or any number of messages in your flow to help qualify your lead. When you’re ready to ask for the user’s email address, add a user input, which is a ManyChat Pro feature.
In the Edit User Input pop-out, select Email for the Reply Type, which will help Facebook autopopulate the user’s email address in the chat. All the user will have to do is click on their address in the chatbox to confirm it or type in an alternate email if they wish.
To capture this data properly, you need to create a custom response. Under Save Response to a Custom Field, enter a name for the new custom field so you can easily access it in the future. I labeled mine Email Address.
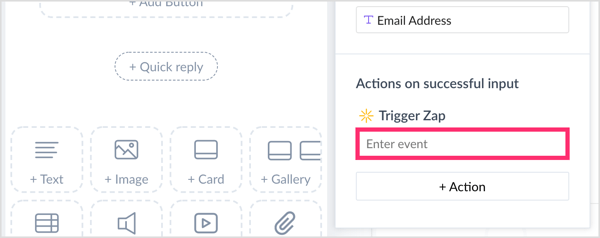
To make the connection between ManyChat and Zapier, and ultimately your email marketing service, click on Action. From the drop-down menu, select Trigger Zap.
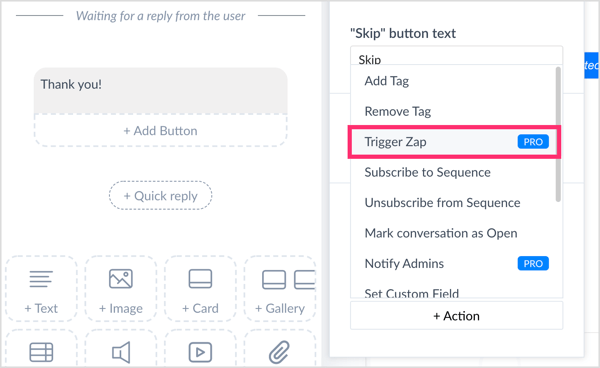
In the text box, enter a name for your zap. Then finish creating your message.
Connect Your Bot to Your Email Marketing Service via Zapier
Now that you’ve created the most important elements of your chatbot flow, the next step is to log into your Zapier account. On the main page, click the Make a Zap! button.
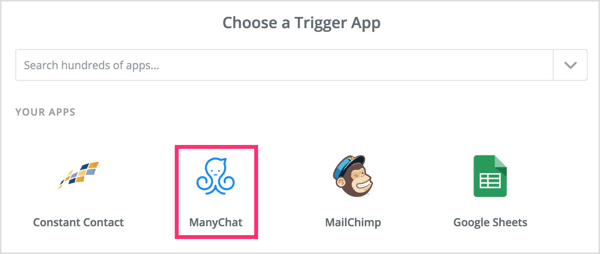
On the following page, choose a trigger app. The trigger app is where the action is originated. In other words, it’s point A of your data that you want to get over to point B. In this case, the trigger app is ManyChat. If you haven’t used ManyChat as your trigger app before, you’ll need to search for it in the search bar.
Now you’ll select the zap trigger. Click on Show Less Common Options at the bottom of the list and select New “Trigger a Zap” Event. Then click the Save + Continue button.
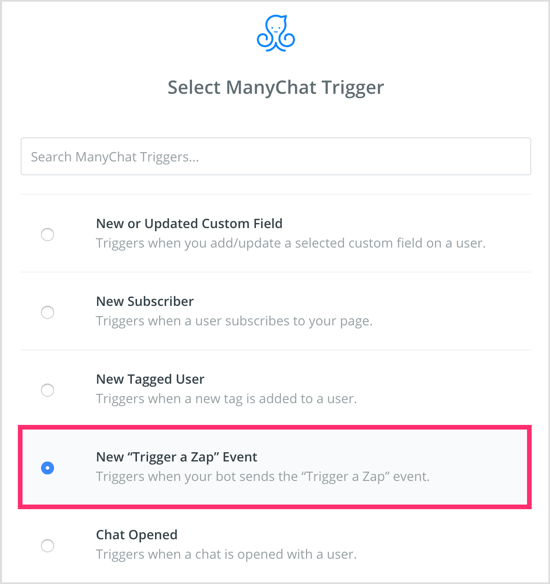
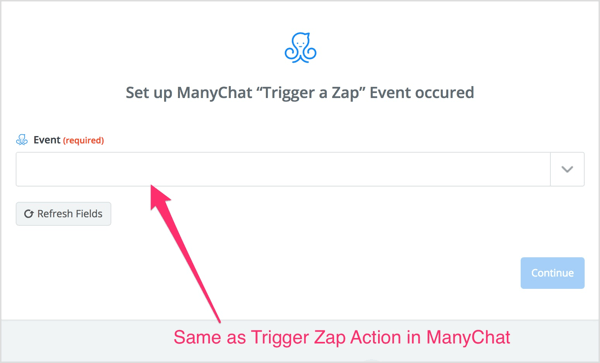
You’re now prompted to connect and/or select your ManyChat account. This allows Zapier to communicate with ManyChat and vice versa. This is where the fun begins! For the event, select the Trigger Zap action you just created in your ManyChat flow.
Once this part of your zap is set up, you can test it. Don’t worry if the test comes back unsuccessful. That typically just means there’s no data there to test. Move to the next step and add an action step.
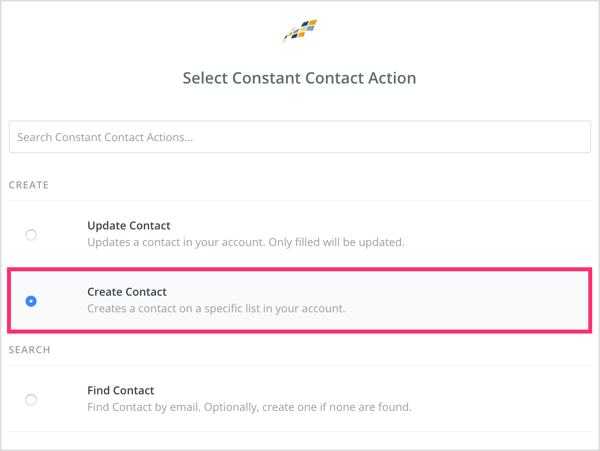
The action step part of this Zapier integration is your email service provider. In the search, select or look up email service provider. For this example, we’re using Constant Contact.
On the next page, select Create Contact. If you’re using a different email service provider, your selection may be slightly different here.
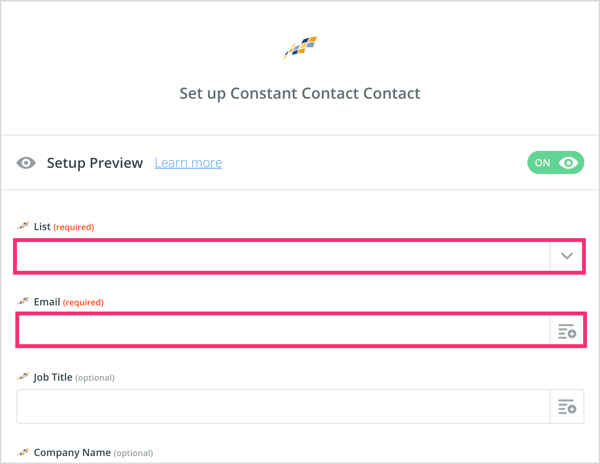
Now you’ll need to connect the dots and select the data inside of ManyChat and Mailchimp from the fields inside of Zapier. This is how you create the path for which the data in ManyChat will get placed inside your email marketing service.
From the List drop-down menu, select the list you created in your email marketing provider (refer to Step #1). For Email, choose the custom field you created in ManyChat to save the user’s email response.
The other items on the list are optional but the first two (List and Email) are required to make the connection work properly.
After you click Continue, you’ll be prompted to run an optional test. The test is going to come up with an error, which is only because no one has actually gone through this flow before. So if you really want to test this, you personally need to go through, as a user, into your chatbot flow. Then your test will show as successful. If you don’t want to run through that step, click Finish.
Only one step remains. Be sure to activate your zap by switching the tab to on!
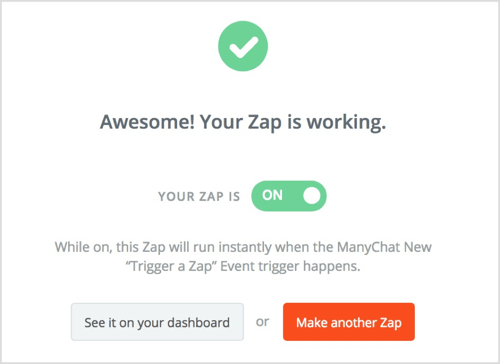
With that, your ManyChat flow is connected to your email marketing service via Zapier.
You can now go through and test it yourself to see if it triggers correctly. This is also a great time to create one of the many growth tools that ManyChat provides: start inviting new people to subscribe to your chatbot, or send out a broadcast to current subscribers inviting them to explore your new flow.
Conclusion
With over 1 billion active users on Facebook Messenger, it’s one of the best places to connect with your target audience. But you should use caution when building your marketing on “rented” land. In other words, you need to own your data. That way if anything were to happen to Facebook or Facebook Messenger, you can take your list elsewhere instead of having to start over.
This is just one of the reasons capturing user information such as email addresses is such a great idea. Although email has far lower open and click-through rates than Facebook Messenger, it can still do many things better. From sending more long-form messages to mini-courses and automation, email is still a great tool in your marketing toolbox.
Combining the power of bots with the proven results of email marketing makes good marketing sense.
What do you think? Will you try this tactic to build your email list via your Messenger bot? Please share your thoughts in the comments below.
More articles about Facebook Messenger bots: